AI tool kaise use kare for beginners? आसान भाषा में AI Tools चलाना सीखें, सामान्य गलतियों से बचें और बेहतर Output के लिए सही तरीके व Prompt आसानी से जानें।
अगर आपने कभी ChatGPT, Gemini या किसी दूसरे AI tool को खोलकर सोचा है कि “इसमें आखिर लिखना क्या है?”, तो शुरुआत में ऐसा महसूस होना बिल्कुल सामान्य है।
AI tool का इस्तेमाल सिर्फ सवाल लिखकर जवाब लेने तक सीमित नहीं है। आप इससे किसी कठिन topic को समझ सकते हैं, email का draft तैयार कर सकते हैं, blog की planning कर सकते हैं, code समझ सकते हैं, ideas generate कर सकते हैं, text summarize कर सकते हैं और कई दूसरे digital tasks में सहायता ले सकते हैं।
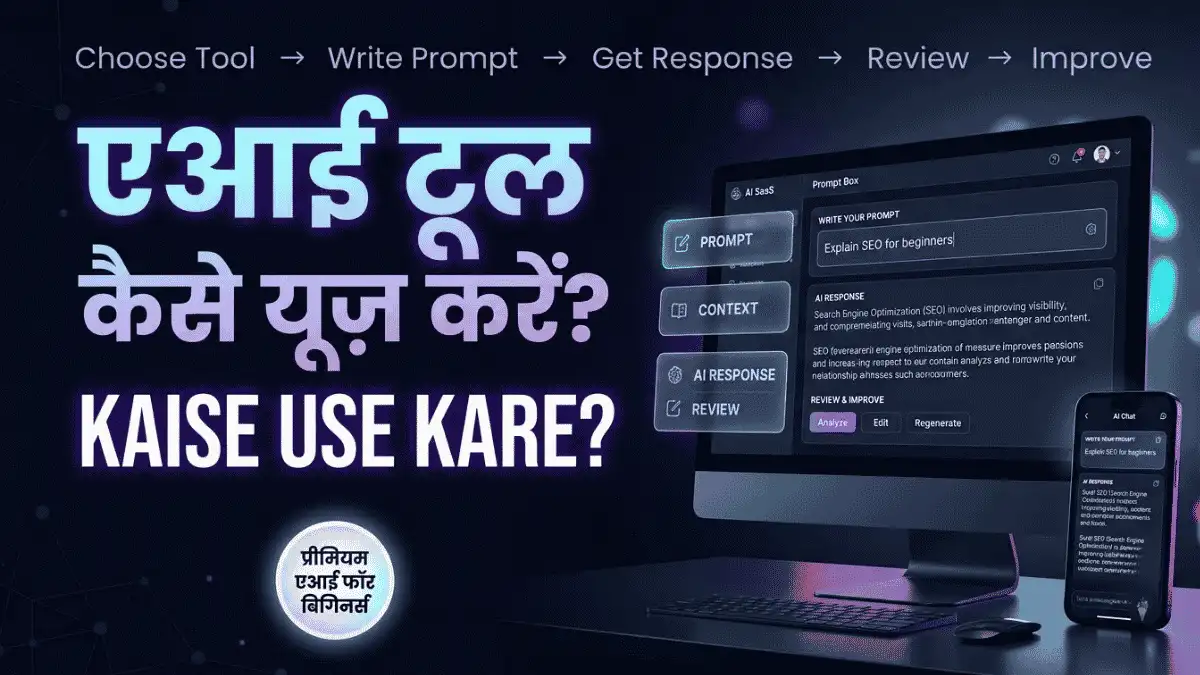
लेकिन एक बात शुरुआत में समझ लेना जरूरी है—AI को जितना स्पष्ट काम बताएंगे, उसके लिए आपकी जरूरत के अनुसार जवाब तैयार करना उतना आसान हो सकता है।
उदाहरण के लिए:
“Fitness पर article लिखो।”
की तुलना में:
“Beginners के लिए घर पर exercise करने के फायदे पर 800 शब्दों का सरल हिंदी article तैयार करो। शुरुआत में 3 मुख्य फायदे बताओ, फिर beginner-friendly exercises की सूची दो और अंत में जरूरी सावधानियां समझाओ।”
दूसरे prompt में AI को काम, audience, भाषा, length और structure के बारे में ज्यादा जानकारी मिलती है।
हालांकि अच्छा prompt भी सही जवाब की guarantee नहीं देता। AI से मिले महत्वपूर्ण facts को verify करना और final output को review करना आपकी जिम्मेदारी रहती है।
इस guide में आप सीखेंगे कि सही AI tool कैसे चुनें, पहला prompt कैसे लिखें, context कैसे दें, response को कैसे जांचें और जरूरत पड़ने पर उसी जवाब को बेहतर कैसे करवाएं।
AI Tool क्या है और यह कैसे काम करता है?
AI tool ऐसा software या application होता है जो Artificial Intelligence की मदद से user के input के आधार पर output तैयार करता है।
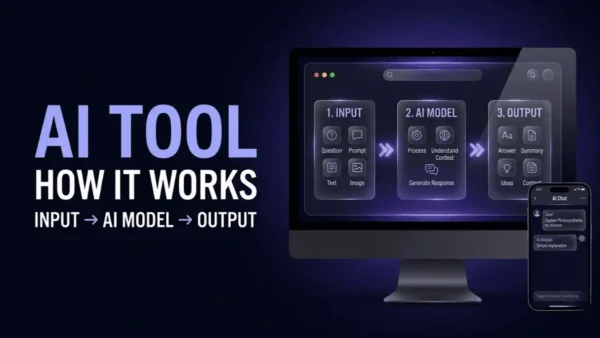
आपका input कई रूपों में हो सकता है:
- सवाल
- निर्देश
- Text
- Image
- File
- Data
- किसी task का context
उदाहरण के लिए आप AI से कह सकते हैं:
“इस paragraph को आसान हिंदी में समझाओ।”
या:
“इस data को table में व्यवस्थित करो।”
या:
“इस JavaScript code में error की संभावित वजह समझाओ।”
इसके पीछे एक AI model काम करता है, जो अपने training और उपलब्ध context के आधार पर response तैयार करता है। अलग-अलग AI tools अलग models, features और capabilities का इस्तेमाल कर सकते हैं, इसलिए समान prompt देने पर भी उनके outputs अलग हो सकते हैं।
एक beginner के लिए technical architecture समझना जरूरी नहीं है। शुरुआत में इतना समझना काफी है:
आप Input देते हैं → AI उसे process करता है → Output देता है।
लेकिन Output को final truth मान लेना सही नहीं है। AI गलत, अधूरी या outdated information भी दे सकता है। खासकर current information, statistics और महत्वपूर्ण decisions से जुड़े मामलों में जवाब को भरोसेमंद source से verify करना चाहिए।
Beginners को AI Tool इस्तेमाल करने से पहले क्या जानना चाहिए?
AI tool इस्तेमाल करने से पहले किसी complicated technique को याद करने की जरूरत नहीं है। कुछ basic habits शुरुआत को काफी आसान बना देती हैं।
1. पहले अपना Goal तय करें
AI खोलने से पहले खुद से पूछें:
“मुझे AI से आखिर करवाना क्या है?”
“कुछ लिखना है” बहुत broad goal है।
“एक customer support email का draft तैयार करना है” ज्यादा स्पष्ट goal है।
2. जरूरी Context तैयार रखें
AI को वह information दें जिसकी उसे task पूरा करने के लिए जरूरत है।
उदाहरण:
अगर आप email लिखवा रहे हैं, तो recipient, purpose और tone बताना उपयोगी हो सकता है।
अगर आप code debug करा रहे हैं, तो language, relevant code और error message देना ज्यादा उपयोगी होगा।
3. AI के जवाब को तुरंत Final न मानें
AI का response fluent और confident लग सकता है, फिर भी उसमें गलती हो सकती है।
इसलिए महत्वपूर्ण information के लिए:
Generate → Check → Verify
का तरीका अपनाएं।
4. Sensitive Information से सावधान रहें
Password, OTP, banking details, API keys, private documents या अन्य confidential information किसी AI tool में डालने से बचें।
किसी specific tool में data कैसे handle किया जाता है, यह समझने के लिए उसकी current privacy policy और data-handling information देखना बेहतर है।
5. Tool की Capability समझें
हर AI tool हर काम के लिए समान नहीं होता।
कोई tool text और writing में उपयोगी हो सकता है, जबकि दूसरे में image generation, coding, file analysis या web-based features ज्यादा relevant हो सकते हैं।
इसलिए पहले काम तय करें, फिर tool चुनें।
AI Tool कैसे Use करें? Step-by-Step तरीका
अलग-अलग AI tools का interface अलग हो सकता है, लेकिन सामान्य workflow काफी हद तक समान रहता है:
Goal → Tool → Prompt → Context → Output → Review → Improve
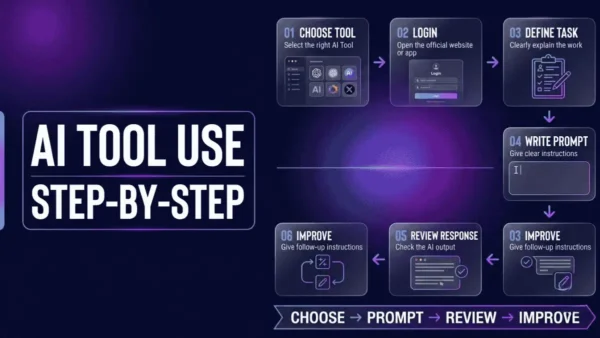
अब इसे step-by-step समझते हैं।
Step 1 — अपना काम तय करें
सबसे पहले यह स्पष्ट करें कि AI से कौन-सा काम करवाना है।
उदाहरण:
- Blog का outline बनाना
- Email लिखना
- कठिन concept समझना
- Text summarize करना
- Image बनाना
- Code debug करना
- Ideas generate करना
- Data व्यवस्थित करना
एक स्पष्ट task होने पर अगला prompt लिखना काफी आसान हो जाता है।
Step 2 — अपने काम के अनुसार AI Tool चुनें
अब देखें कि आपके task के लिए किस तरह का AI tool चाहिए।
| आपका काम | किस तरह का AI Tool उपयोगी हो सकता है? |
|---|---|
| Writing / Content | Text-based AI tool |
| Image Creation | AI image generator |
| Coding | Coding-capable AI tool |
| Data Analysis | Data/file analysis सुविधा वाला tool |
| Research | Relevant search/research features वाला tool |
| Translation | Language-capable AI tool |
केवल लोकप्रिय होने के कारण कोई tool चुनना जरूरी नहीं है।
Tool चुनते समय उसके:
- Features
- Output quality
- Usage limits
- Privacy
- Free/Paid options
- आपके specific task के लिए capabilities
देखें।
Step 3 — AI Tool खोलें और उपलब्ध features समझें
Tool की website या app खोलें।
कुछ tools में आप सीधे chat box में prompt लिख सकते हैं, जबकि कुछ में अलग-अलग modes या features उपलब्ध हो सकते हैं।
उदाहरण के लिए किसी tool में आपको text chat के साथ:
- File upload
- Image generation
- Web search
- Data analysis
- Voice interaction
जैसी सुविधाएं मिल सकती हैं।
लेकिन इन features की availability tool और plan के अनुसार बदल सकती है। इसलिए current features को संबंधित tool के official source से check करना बेहतर है।
Step 4 — अपना काम स्पष्ट Prompt में लिखें
अब AI को बताएं कि आपको क्या चाहिए।
एक simple formula याद रख सकते हैं:
Task + जरूरी Context + Expected Output
उदाहरण:
कम स्पष्ट Prompt
“Fitness पर article लिखो।”
बेहतर Prompt
“Beginners के लिए घर पर exercise करने के फायदे पर 800 शब्दों का सरल हिंदी article लिखो। 5 मुख्य फायदे बताओ और अंत में beginner के लिए जरूरी सावधानियां शामिल करो।”
दूसरे prompt में AI को केवल topic नहीं, बल्कि audience, length और expected structure भी पता है।
ध्यान रखें—हर prompt को लंबा बनाना जरूरी नहीं है। केवल वही information दें जो task के लिए relevant है।
Step 5 — जरूरत के अनुसार Context दें
कई बार prompt सही होने के बावजूद output generic लगता है क्योंकि AI के पास पर्याप्त background information नहीं होती।
मान लीजिए आप AI से website content लिखवा रहे हैं।
सिर्फ:
“Homepage का content लिखो।”
कहने पर result काफी broad हो सकता है।
इसके बजाय:
“यह एक Hindi AI tools website है। Audience beginners हैं। Homepage के hero section के लिए 60–80 शब्दों का simple और trustworthy introduction लिखो। भाषा conversational Hindi रखें और overclaiming से बचें।”
अब AI के पास काम करने के लिए ज्यादा relevant context है।
Context में क्या दिया जा सकता है?
Task के अनुसार:
- Audience
- Background
- Existing text
- Product information
- Technical environment
- Examples
- Goals
- Limitations
लेकिन context का मतलब हर छोटी-बड़ी जानकारी भर देना नहीं है। जो जानकारी result को प्रभावित करती है, वही दें।
Step 6 — AI का Response ध्यान से Review करें
AI का जवाब मिलते ही Copy करके इस्तेमाल न करें।

पहले देखें:
- क्या उसने actual task पूरा किया?
- क्या कोई जरूरी instruction छूट गया?
- क्या जवाब सही audience के लिए है?
- क्या format वही है जो आपने मांगा था?
- क्या कोई assumption गलत है?
- क्या repetition है?
- क्या कोई factual claim verify करना जरूरी है?
अगर answer अच्छा दिख रहा है, तब भी महत्वपूर्ण claims की जांच करें।
Step 7 — जरूरत हो तो Follow-up Instruction दें
पहला response आपकी final जरूरत के अनुसार न हो तो पूरा काम फिर से शुरू करने की जरूरत नहीं है।
उसी conversation में स्पष्ट follow-up instruction दे सकते हैं।
उदाहरण:
“इसे और आसान हिंदी में लिखो।”
या:
“पहले paragraph को छोटा करो और एक practical example जोड़ो।”
या:
“तीसरे point को table के रूप में प्रस्तुत करो।”
या:
“अनावश्यक repetition हटाकर इसे लगभग 500 शब्दों में रखें।”
यह तरीका खासकर editing और refinement के लिए उपयोगी है।
AI Tool के लिए अच्छा Prompt कैसे लिखें?
अच्छा prompt लिखने का मतलब complicated language इस्तेमाल करना नहीं है।
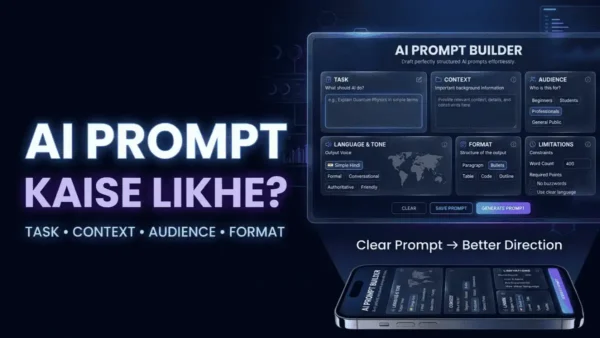
असल लक्ष्य है:
AI को काम समझने के लिए जरूरी information स्पष्ट रूप से देना।
एक उपयोगी prompt में जरूरत के अनुसार ये elements हो सकते हैं:
| Element | क्या बताता है? |
|---|---|
| Task | AI को क्या करना है |
| Context | Background information क्या है |
| Audience | जवाब किसके लिए है |
| Language & Tone | भाषा और writing style कैसी हो |
| Format | Paragraph, bullets, table आदि |
| Constraints | Length, limitations या जरूरी rules |
| Example | Desired output का sample |
हर prompt में इन सभी elements को डालना जरूरी नहीं है।
एक practical example
Basic
“SEO पर लिखो।”
Better
“Beginners के लिए SEO क्या है, इसे सरल हिंदी में समझाओ।”
More Specific
“Beginners के लिए ‘SEO क्या है?’ विषय को लगभग 700 शब्दों में सरल हिंदी में समझाओ। पहले basic definition दो, फिर crawling, indexing और ranking का सामान्य अंतर बताओ। हर major concept के साथ एक छोटा example दो और technical terms का आसान अर्थ भी बताओ।”
यहां तीसरे prompt की ताकत केवल उसकी length नहीं है। उसमें scope, audience, structure और expected explanation ज्यादा स्पष्ट है।
क्या लंबा Prompt हमेशा बेहतर होता है?
नहीं।
यह beginners की सबसे आम गलतफहमियों में से एक है।
मान लीजिए आपका काम सिर्फ एक sentence को Hindi में translate करना है।
इसके लिए:
“इस sentence का natural Hindi translation दो।”
पर्याप्त हो सकता है।
उसमें 300 शब्दों की unnecessary instructions जोड़ने से output जरूरी नहीं कि बेहतर हो जाए।
दूसरी ओर, complex task में context ज्यादा चाहिए हो सकता है।
इसलिए बेहतर rule है:
Prompt उतना ही detailed रखें जितना task के लिए जरूरी है।
यानी:
Short + Clear > Long + Confusing
और:
Complex Task → अधिक Relevant Context
AI से Blog कैसे बनाएं?
AI की मदद से blog तैयार किया जा सकता है, लेकिन पूरा article एक ही prompt में generate करवाकर सीधे publish करना सबसे अच्छा workflow नहीं है।
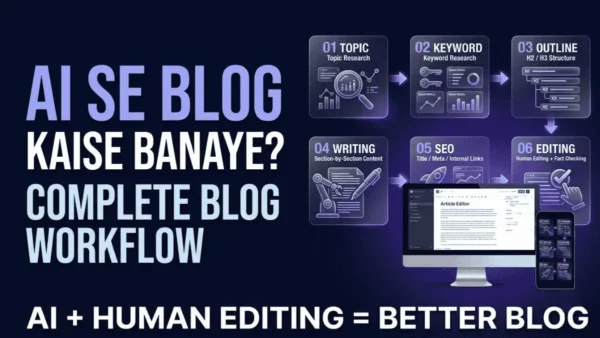
बेहतर तरीका है कि blog को छोटे stages में तैयार करें।
Step 1 — Topic और Search Intent समझें
पहले तय करें कि article किस सवाल या problem को solve करेगा।
AI से brainstorming, topic variations और possible subtopics लिए जा सकते हैं।
लेकिन keyword search volume, keyword difficulty या current search behavior जैसे SEO metrics के लिए dedicated SEO tools और actual search results से verification करना बेहतर है।
Step 2 — Blog Outline बनाएं
अब article का structure तैयार करें।
उदाहरण:
H1 → Introduction → H2 → H3 → Examples → FAQ → Conclusion
हर section के लिए यह तय करें:
- Reader का कौन-सा सवाल solve होगा?
- कौन-सी information जरूरी है?
- क्या example चाहिए?
- क्या table उपयोगी होगा?
- क्या information पहले ही कहीं दी जा चुकी है?
आखिरी सवाल repetition कम करने में खास मदद करता है।
Step 3 — Section-by-Section Content तैयार करें
पूरे 3000–4000 शब्दों का article एक ही बार generate करवाने के बजाय जरूरत के अनुसार अलग sections तैयार कर सकते हैं।
उदाहरण:
“इस outline के H2 section ‘AI Tool क्या है?’ को beginners के लिए सरल हिंदी में लगभग 300 शब्दों में समझाएं। अगले sections की जानकारी यहां repeat न करें।”
इस तरह हर section का उद्देश्य स्पष्ट रहता है।
Step 4 — SEO और Readability Review करें
Draft तैयार होने के बाद AI से review करवाया जा सकता है:
- Title
- Headings
- Keyword placement
- Readability
- Internal linking opportunities
- Repetition
- Missing subtopics
लेकिन AI के सुझावों को automatic SEO rule न मानें।
Keyword को केवल इसलिए बार-बार न डालें कि density बढ़ जाए। Content का मुख्य उद्देश्य reader के सवाल का उपयोगी जवाब देना होना चाहिए।
Step 5 — Human Editing और Fact Checking करें
यह सबसे महत्वपूर्ण stage है।
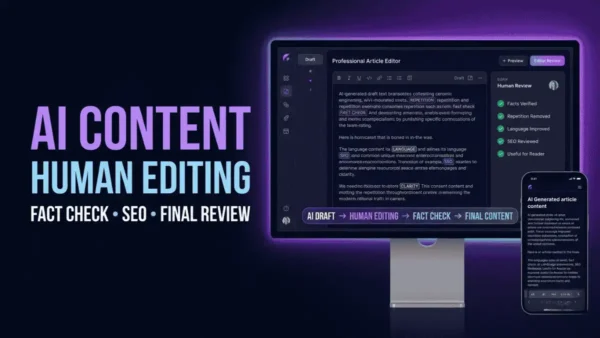
AI-generated draft को पढ़ते समय देखें:
- क्या भाषा natural लग रही है?
- क्या एक ही बात अलग-अलग sections में दोहराई गई है?
- क्या कोई generic statement है?
- क्या examples वास्तविक context से जुड़े हैं?
- क्या कोई claim बिना evidence के है?
- क्या facts current हैं?
जहां जरूरत हो, अपने examples, observations और domain knowledge जोड़ें।
अंतिम article ऐसा लगना चाहिए कि AI ने सिर्फ drafting में मदद की है, लेकिन final judgment किसी इंसान ने लिया है।
Beginners की Common AI Mistakes
AI tool इस्तेमाल करते समय शुरुआती गलतियां सामान्य हैं। अच्छी बात यह है कि इनमें से ज्यादातर गलतियां कुछ basic habits से कम की जा सकती हैं।
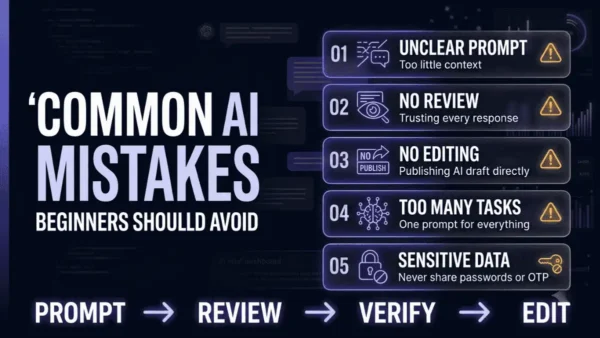
1. बहुत vague Prompt देना
“Article लिखो।”
यह AI को बहुत कम दिशा देता है।
बेहतर: topic, audience और expected output बताएं।
2. जरूरी Context छिपा देना
अगर आप चाहते हैं कि output आपकी specific situation के अनुसार हो, तो relevant background information दें।
3. AI के हर जवाब को सही मान लेना
AI गलत या अधूरी information दे सकता है।
विशेषकर:
- Statistics
- Dates
- Current events
- Technical specifications
- Legal information
- Financial information
- Health-related information
को appropriate authoritative sources से verify करें।
4. बिना Editing के AI Content Publish करना
AI-generated text में repetition, generic wording या context से बाहर की बातें हो सकती हैं।
Publish करने से पहले human review करें।
5. एक Prompt में बहुत सारे unrelated काम डाल देना
उदाहरण:
“Research करो, article लिखो, SEO करो, competitor analysis करो, social posts बनाओ और email भी तैयार करो।”
इतने अलग tasks को एक साथ देने के बजाय workflow को stages में बांटना ज्यादा practical हो सकता है।
6. Prompt को जरूरत से ज्यादा complicated बनाना
हर instruction जोड़ते जाना solution नहीं है।
पहले देखें कि task के लिए वास्तव में कौन-सी information जरूरी है।
7. Sensitive Information साझा करना
Password, OTP, API key, banking details या confidential documents को बिना सोचे AI tool में paste न करें।
जरूरत हो तो sensitive information को remove या anonymize करें।
8. हर खराब Output को Prompt की गलती समझना
कभी समस्या prompt में नहीं, बल्कि:
- model की capability
- missing information
- ambiguous source
- unavailable tool feature
- task की complexity
में भी हो सकती है।
इसलिए खराब response मिलने पर पहले समस्या identify करें, फिर prompt बदलें।
AI Tool इस्तेमाल करने की Quick Checklist
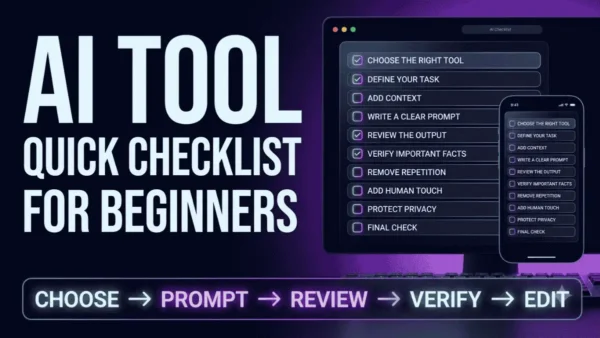
किसी भी महत्वपूर्ण task से पहले यह 7-point checklist देख सकते हैं:
- Goal स्पष्ट है?
- सही AI tool चुना है?
- Task साफ लिखा है?
- जरूरी Context दिया है?
- Expected Format बताया है?
- Response Review किया है?
- Important Facts Verify किए हैं?
और अगर response उम्मीद के मुताबिक नहीं आया:
Identify Problem → Follow-up Instruction → Review Again
Beginners के लिए AI Tool के Practical Use Cases
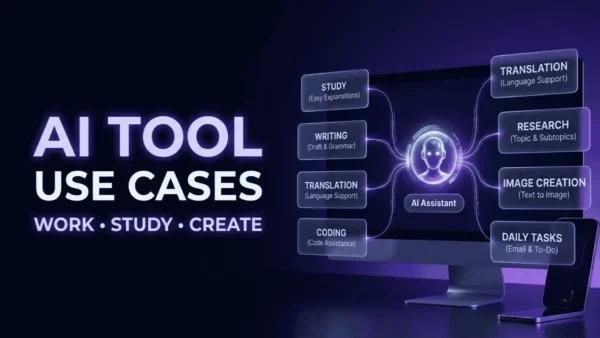
AI का इस्तेमाल केवल blog writing के लिए नहीं किया जाता। सही instructions के साथ यह रोजमर्रा के कई digital tasks में assistant की तरह काम आ सकता है।
| काम | AI से किस तरह सहायता ले सकते हैं? |
|---|---|
| पढ़ाई | कठिन concepts समझना, notes organize करना, practice questions बनाना |
| Writing | ideas, drafts, rewriting और grammar review |
| Blogging | topic ideas, outlines, section drafts और content review |
| Translation | text को दूसरी भाषा में बदलना और tone adjust करना |
| Coding | code explain करना, debugging में सहायता और documentation |
| Research | questions, subtopics और research directions की brainstorming |
| Image Creation | text description के आधार पर image concepts या images बनाना, यदि tool यह सुविधा देता हो |
| Daily Tasks | emails, summaries, planning और information organization |
इन use cases में AI को decision-maker के बजाय assistant की तरह इस्तेमाल करना ज्यादा सुरक्षित और practical है।
विशेषकर research, coding और महत्वपूर्ण decisions में output को independently check करना जरूरी है।
AI Tool का इस्तेमाल करते समय Accuracy और Privacy कैसे संभालें?
AI की convenience के साथ दो चीजें हमेशा ध्यान में रखें:
Accuracy
AI का fluent response factual correctness की guarantee नहीं है।
अगर कोई information आपके लिए महत्वपूर्ण है, तो उसे appropriate reliable source से verify करें।
उदाहरण:
“यह product feature कब launch हुआ?”
ऐसे सवाल में current official documentation ज्यादा भरोसेमंद source हो सकता है।
Privacy
AI को वही information दें जिसे उस context में share करना उचित हो।
विशेष रूप से:
- Password
- OTP
- API Keys
- Banking details
- Identity documents
- Confidential business information
जैसी जानकारी को बिना आवश्यकता share न करें।
किसी AI service की privacy और data-handling practices को समझने के लिए उसकी current official policy देखें।
क्या AI Tool का इस्तेमाल Free में किया जा सकता है?
यह पूरी तरह उस specific AI tool पर निर्भर करता है।
कुछ tools free access देते हैं, जबकि कुछ में:
- Usage limits
- Feature restrictions
- Daily/monthly limits
- Paid-only models
- Premium features
हो सकते हैं।
इसलिए “AI tool free है” और “उसका हर feature free है”—इन दोनों बातों को एक जैसा न समझें।
Pricing और limits बदल भी सकती हैं, इसलिए किसी specific tool की current जानकारी उसकी official website या pricing page से verify करना बेहतर है।
AI Tool से बेहतर Result पाने के लिए 7 Practical Tips
अगर आप शुरुआत से ही बेहतर output चाहते हैं, तो इन habits को अपनाएं।
1. Task से शुरुआत करें
पहले बताएं कि AI को करना क्या है।
2. जरूरी Context दें
जो information result को प्रभावित करती है, उसे साझा करें।
3. Audience बताएं
Beginner, student, customer या professional—किसके लिए output चाहिए, यह स्पष्ट करें।
4. Format तय करें
Paragraph, bullets, table, checklist या किसी specific structure की जरूरत हो तो बताएं।
5. Example दें
अगर desired output का pattern समझाना मुश्किल है, तो छोटा example काफी मदद कर सकता है।
6. एक खराब response को refine करें
हर बार नया chat शुरू करने के बजाय existing response में targeted सुधार मांगें।
7. Final output खुद जांचें
AI का काम यहीं खत्म नहीं होता। Final judgment आपका होना चाहिए।
नहीं। शुरुआत में किसी advanced technical knowledge की जरूरत नहीं होती। आपको अपना काम सामान्य भाषा में बताकर शुरुआत करनी चाहिए और फिर response को देखकर सीखना चाहिए कि कौन-सी information देने से output बेहतर होता है।
Task को स्पष्ट लिखें और जरूरत के अनुसार context, audience, language और output format बताएं। अगर पहला जवाब सही नहीं है, तो कमी को स्पष्ट करके follow-up instruction दें।
AI का जवाब उपयोगी हो सकता है, लेकिन उसे हर परिस्थिति में अंतिम सत्य नहीं मानना चाहिए। महत्वपूर्ण facts, statistics, current information और high-stakes information को भरोसेमंद sources से verify करें।
AI से blog का draft तैयार किया जा सकता है, लेकिन सीधे publish करने के बजाय human editing, fact checking, originality और reader usefulness की जांच करना बेहतर है।
नहीं। सामान्य writing, learning, planning, summarization और दूसरे conversational tasks के लिए coding की आवश्यकता नहीं होती। Programming की जरूरत मुख्य रूप से तब बढ़ती है जब आप AI को software, API या automation workflows के साथ integrate करना चाहते हैं।
संवेदनशील जानकारी जैसे password, OTP, banking details या API keys साझा करने से बचें। जरूरत होने पर data को anonymize करें और संबंधित AI service की privacy तथा data-handling policy समझें।
Conclusion
AI Tool इस्तेमाल करना सीखने के लिए आपको technical expert बनने की जरूरत नहीं है। शुरुआत एक simple process से करें:
Goal तय करें → सही Tool चुनें → स्पष्ट Prompt दें → जरूरी Context जोड़ें → Output Review करें → जरूरत पर Improve करें।
सबसे महत्वपूर्ण बात यह है कि AI के पहले जवाब को अंतिम जवाब न मानें। अगर response आपकी जरूरत के अनुसार नहीं है, तो समस्या पहचानें और उसी conversation में स्पष्ट follow-up instruction देकर सुधार करें।
Blog Writing, पढ़ाई, research, coding, translation, image creation और रोजमर्रा के कई digital tasks में AI आपकी मदद कर सकता है। लेकिन इसकी मदद लेने का मतलब यह नहीं कि हर generated answer सही या publish-ready है।
AI को एक तेज assistant की तरह इस्तेमाल करें, अंतिम authority की तरह नहीं।
शुरुआत में छोटे tasks चुनें। एक ही काम के अलग-अलग prompts आजमाएं और देखें कि context, format और instructions बदलने पर result कैसे बदलता है। धीरे-धीरे आपको यह समझ आने लगेगा कि AI से बेहतर काम करवाने का रहस्य कोई जादुई prompt नहीं, बल्कि स्पष्ट लक्ष्य, सही context और अच्छे judgment में है।
यही समझ आपको केवल AI tool इस्तेमाल करने वाले beginner से आगे बढ़ाकर AI के साथ प्रभावी तरीके से काम करने वाला user बना सकती है।